Streaming has exploded in admiration, offering gamers, artists, and entertainers a platform to share their talents with a global audience. While PC users have been subject to the streaming scene, Chromebook users can join the fray thanks to technical advances and cloud-based tools.
This guide is openly crafted for How to go live on Twitch on Chromebook? Whether you’re an experienced gamer or a creative looking to program your work, we’ll cover everything from setting up your Chromebook for streaming to optimizing your Twitch broadcast. So plug in your mic, set up your webcam, and make it live with your Chromebook.
A brief overview of Twitch streaming:
Is it a dynamic platform enabling individuals to broadcast live content to audiences worldwide? Mainly known for video game streaming, Twitch has expanded to include various content such as music acts, tutorial sessions, and talk shows.
Streamers can interact with viewers through chat, building a public around their content. Monetization is possible through payments, donations, and ad revenue. The platform’s suitability allows unprofessional and professional content creators to share their passions and engage with like-minded persons, making it a hub for digital entertainment.
How to go live on Twitch on Chromebook: Prerequisites

Before diving into the world of flowing on Twitch using your Chromebook, there are several basics you’ll need to consider. Firstly, ensure that your Chromebook is well-matched with the latest type of Chrome OS to take advantage of the most recent updates and features. You’ll also require a stable internet connection with enough bandwidth to support live streaming.
Also, having a Twitch account is necessary, so if you still need to sign up, now’s the time. Lastly, gather your streaming gear: a good quality webcam and microphone will meaningfully improve the quality of your stream and the general experience for your viewers.
Creating a Twitch account if needed.
If you’re new to Twitch and still need an account, setting one up is a simple and essential step in your streaming journey. Go to Twitch. Click the “Sign Up” button at the page’s top right corner. Fill in the vital details, such as your favorite username, password, email speech, and date of birth. You’ll then need to verify your account through email.
Once your account is activated, take some time to customize your channel; add a profile picture, create an attractive channel account, and set your streaming schedule if you have one. Your Twitch account is now ready, and you’re one step closer to distributing your content to the world.
Setting Up Your Chromebook
Setting up your Chromebook properly is supreme before you can start streaming on Twitch. Begin by informing your Chromebook to confirm you have the latest version of Chrome OS. This update provides the newest features and improves your device’s performance. Next, you’ll need to enable the Linux (Beta) environment if you wish to use streaming software that requires Linux support.
Ensure you have enough storage space, as streaming software and footage can take up much room. Adjust your Chromebook’s settings to house your streaming setup; this comprises configuring display resolutions, handling audio inputs, and improving your system’s battery for prolonged use. With your Chromebook set up correctly, you’ll have a dependable and efficient streaming workstation.
See Also: How to Clear App Cache on Chromebook
Optimizing Chromebook Settings for Streaming
To ensure your Chromebook operates at peak performance during your Twitch streams, optimizing its settings is crucial. First, adjust the energy-saving settings to prevent your Chromebook from sleeping mid-stream. It’s also essential to manage your audio and video settings — use the sound settings to select your external microphone as the input device and ensure your webcam is chosen for video.
Next, tweak the visual settings by adjusting the screen resolution and refresh rate to match your streaming software’s requirements for optimal broadcast quality.
Close any unnecessary applications to free up system resources and reduce the risk of overloading your CPU during a stream. With these settings, your Chromebook will be better equipped to deliver a smooth streaming experience.
Installing any necessary apps or extensions for Twitch
To elevate your Twitch streaming on a Chromebook, installing any pertinent apps or browser extensions is essential. If you’re using Chrome OS’s native competencies, consider installing the Twitch app from the Google Play Store for direct access to your account and seamless streaming. For those looking to use more advanced streaming software, such as OBS Studio, allowing Linux on your Chromebook and connecting the Linux version of OBS is recommended.
Also, browser extensions like Stream Labs can improve your stream with alerts, overlays, and widgets. Remember only to download apps and extensions from important sources to maintain the security and honesty of your device and personal information.
Twitch Account Configuration
Once your Twitch account is created and your Chromebook setup is whole, the next step is organizing your Twitch account for optimal stream presentation. This includes fine-tuning your station favorites, such as setting up your stream title, description, and group to reflect the content you’ll be distributing. Visit the ‘Creator Dashboard’ on Twitch to access tools that will help you manage your stream.
How to go live on Twitch on Chromebook? You can configure essential settings like stream quality, chat moderation tools, and donation options here. Also, consider enabling two-factor authentication to secure your account further. Remember to connect with potential viewers by customizing your profile with engaging visuals and detailed information about your streaming schedule and content themes. A well-configured Twitch account ensures a quality stream for your viewers and helps build your streaming brand.
Adjusting Twitch stream settings
Optimizing your Twitch stream settings is crucial to delivering high-quality viewing knowledge. Log into Twitch and go directly to the ‘Creator Dashboard.’ From here, access the ‘Stream’ settings to adjust your distribution bitrate, which affects video quality and viewer knowledge—setting it too high may cause shielding for viewers.
At the same time, too low can result in poor video quality. Choose a resolution and frame rate that matches your hardware capabilities and internet speed. Also, under the ‘Stream Key & Preferences’ section, copy your unique stream key, essential for linking your streaming software to your Twitch account. Take the time to experiment with different settings to find the perfect balance for smooth and professional streams.
Learning the Twitch Dashboard functionality:
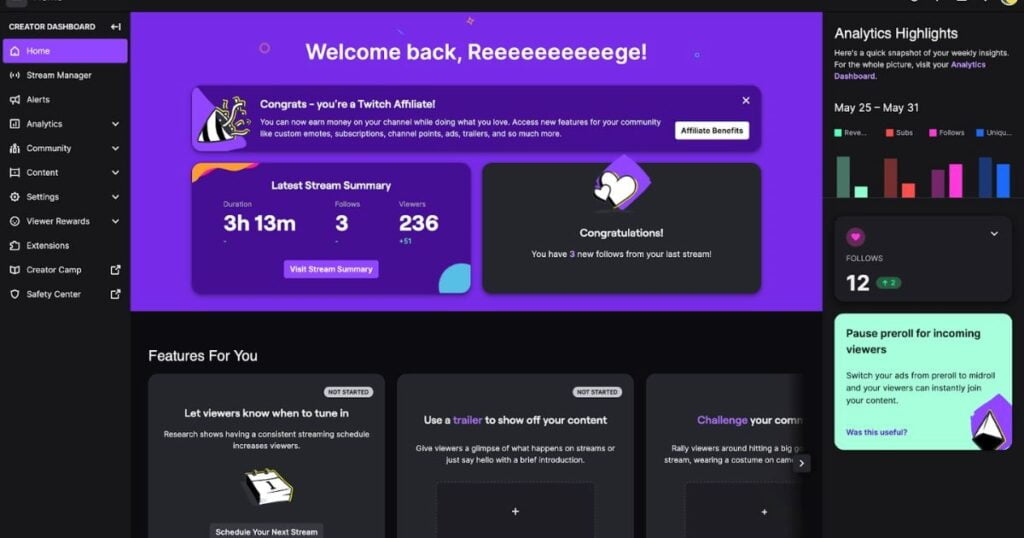
The Twitch Dashboard is your knowledge center for handling every aspect of your live stream. Publicizing yourself with its functionalities can meaningfully improve your ability to be involved with your audience and grow your channel. Within the dashboard, you can display your stream’s presentation with real-time figures, manage your stream settings, and interact with viewers via chat.
Utilize the dashboard to establish and launch events, manage your video public library, set up polls, and create highlights from past brooks. By grasping the dashboard, you can influence Twitch’s tools to initial the streaming experience for you and your viewers, eventually assisting you in emerging a more connected and devoted community.
Going Live
Before you take the leap and start flowing, safeguarding everything is in order, which is pivotal for a smooth ‘Going Live’ process. Double-check your audio and video feeds for differences, and make sure your lighting is passable.
It’s also essential to have a quick run-through of your content or program for the stream to ensure you are prepared. When you’re ready, simply hit the ‘Go Live’ button on your streaming software, and your transmission will begin on Twitch.
Keep an eye on the chat to get involved with your audience, and use the Twitch Dashboard to monitor stream health. Remember, a successful stream is about your content and the real-time communication and community you build with your viewers.
Step-by-step process of starting a live stream on Twitch from your Chromebook
- Ensure all previous settings and software installations are correctly configured.
- Open your broadcasting software or the Twitch app and sign in to your Twitch account.
- Enter the ‘Stream Manager’ in the Twitch dashboard and verify that the stream title and category are set appropriately for your session.
- Set up your camera and microphone and ensure they function correctly.
- Adjust your streaming software settings to match the favorites you’ve recognized on the Twitch platform (bitrate, resolution, etc.).
- Input your unique Twitch brook key into the distribution software to connect your stream to your Twitch channel.
- Behavior: A final check of your stream plan and design, including overlaps, warnings, and other graphic elements.
- Press the ‘Start Streaming’ or ‘Go Live’ button in your distribution software to pledge the watercourse.
- Watch the chat through the Twitch Dashboard or a second screen to interact with viewers.
- Frequently monitor the stream excellence and adjust settings on the fly, if essential, to maintain a stable broadcast.
Remember, being attractive to your audience and providing high-quality content support a positive livestream.
See Also: How to Rename a File on Chromebook ?
Tips for maintaining stream quality and viewer engagement:
To uphold high stream quality and safeguard viewer appointment, start by investing in suitable hardware and a stable internet connection, as they are the backbone of your streaming setup. Use an Ethernet joining instead of Wi-Fi for a more dependable internet service. Frequently update your streaming software to take advantage of the latest features and bug fixes.
Optimize your lighting and sound setup to enhance the viewer experience. Involve your audience by interrelating with chat, offering consistent streaming schedules, and creating interactive content such as Q&A meetings, polls, and challenges.
Keep content fresh and varied to cater to a broad audience and reduce viewer fatigue. Lastly, actively seek feedback from your viewers and use it to improve your streams’ quality and appeal continuously.
After Streaming
After your live stream has concluded, take the time to reflect on the broadcast’s performance. Review the recorded stream to observe your interaction with the audience and the technical quality and pinpoint areas for improvement. Use statistics from the Twitch Dashboard to analyze viewer appointments, such as peak concurrent viewers, new followers, and chat activity.
Connect with your audience post-stream through social media or a follow-up message to thank them for contributing and to provide teasers for future streams. Lastly, highlight any memorable moments or clips from your stream to share across platforms and keep your public engaged even after the stream has ended. These post-stream practices can help foster a loyal viewer base and set the stage for future streaming success.
Practices for ending your stream
When bringing your live stream to a close, ensure a positive and memorable end for your audience by following these practices. Give a genuine thank you to your viewers for their time and contributions to the stream’s conversation. Preview upcoming content or streams to build anticipation and encourage viewers to return. If likely, conduct a ‘raid’ on another streamer’s channel, sharing your public in a show of support and friendship within the streaming community.
Save and publish your stream to your channel so viewers can watch it on request. Lastly, remind your audience to follow or subscribe for announcements on your future streams. Ending on a high note keeps your community engaged and looking forward to more.
Analyzing stream performance and interacting with the community post-stream
After packaging up your live stream, strategically examining presentation and attractiveness to your community is vital for growth.
Utilize analytics tools within your streaming platform to measure viewer patterns, appointment rates, and audience demographics. Reproduce these metrics to determine what content resonated with viewers, and consider how to refine your streaming approach to boost viewer retention and gratification.
Temporarily, maintain post-stream messages with your spectators through social media, public forums, and post-stream response surveys. Replying to comments and participating in thoughts proves your promise to the community and motivates viewer loyalty, paving the way for a more unified and vibrant follower base.
Troubleshooting Common Issues
In live streaming, meeting practical difficulties is not uncommon. To troubleshoot effectively, identify the most common issues, such as audio or video lag, dropping frames, or connectivity problems. Have a checklist handy to run through basic troubleshooting steps like checking connections, confirming stream key entry, and ensuring no background applications are causing conflicts.
If audio issues arise, verify the microphone and audio capture settings. For video, check your encoder settings and hardware acceleration features. If problems persist, consult the support community or technical forums. Remember, a calm and systematic approach to troubleshooting will help you resolve issues quickly, minimize downtime, and uphold an expert stream presence.
Conclusion
In conclusion, successful live streaming is an art form that blends skill, appointment, and content creation into a seamless experience for the streamer and the audience. This guide explored the vital steps for How to go live on Twitch on Chromebook? humanizing viewer appointments, maintaining stream quality, packaging up your session, and showing post-stream examination to foster community growth.
Also, we’ve covered troubleshooting everyday matters to ensure a stable and professional broadcast. Live streaming on stages like Twitch offers a unique chance to connect with a global audience, share your passions, and build a vibrant public. As you mix these performances into your flowing routine, remember that constancy, patience, and reaction to your viewers are essential to long-term growth and success.